After everything is done, and you're relieved that there's no more hard work to do, this is one last job to do. Exporting the Scanlated Pages to common Image Format i.e (JPEG and PNGs). Most HQ scans will release with PNG format, as it's a Lossless format (*well not really a lossless format, buat are using lossless compression, which mean high quality with small size, compared if you use uncompress TIFF), which means PNG are more likely to be larger than JPEG in file size for the same image. To save in the Highest Quality you can use PNG-24 which is lossless. This Guide will teach saving at PNG-8 Small Size with great Quality. If you use JPEG for HQ scans use 90-100, for medium Quality use 70-80, never use below than 60, unless if you have checked and there are no artifacts caused by JPEG compression.
To reduce the file size, when saving as PNG-8, and use this setting.
First go to as usual...
File > Save for Web and Devices... | Alt + Ctrl + Shift + S ( I make a macro for this)
Compare you're preset with Original by selecting 2-Up at the left upper corner.

Selective > Adaptive
Uncheck Transparency
Set Dither to 100%
Now this will leave you with color. For Colors this one will need to be adjusted manually and using your decision, you need a good eyes at this. Colors usually are adjusted according to cleaning style, if your style of cleans are black and white contrast, and remove most of the gray, try at 17 First. Then you can select higher number. If you're cleaning style will leaving gray part (part of the shirt gradient or color, and not the paper gray), Normally it'll would require at least 32 colors, sometimes 17 will be good enough.
Remember this when lowering the Colors:
- ALWAYS check the Gradient part (gray to white, black to white gradient), if your colors are to low some dot like artifact will show on a gradient part.
- Also If you color is to low, look at part of pages that have detailed pattern such as this tiny checker box, they will have artifacts if color is too low. The artifacts is that dot I'm talking about, but way smoother and less grainy.
- Check anything with high complexity and anything with colored gray
These are the comparison of the same settings with 3 different colors setting
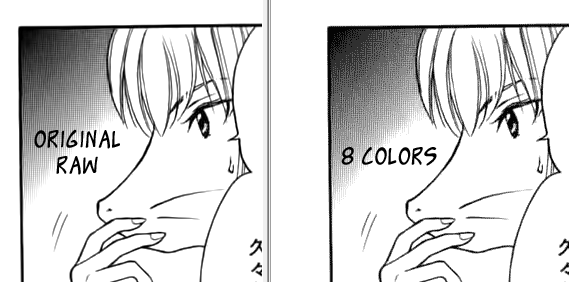 |
| You can see the top upper left corner of the 8 Colors page, the gradient is not smooth, and there are some dot-like. Dither ?? |
 |
| At 17 Colors, the dots disappeared and the gradient is smoother but you can see there are some artifacts, or those dots if you see them closely. |
 |
| Now this really almost have no different with the Original, which would do fine if you save them this way. |
If your scans need to release at really Uncompressed/Lossless quality then always use PNG-24 Settings.
The settings which you used the most should be saved as a Preset so you won't have to set them everytime you want to save. This is not a problem if you only use your Photoshop for Saving the same image everytime, Save for Web and Devices will remember last setting of saved images. If you use Photoshop also for other things, e.g you want to save and image from DSLR to web, and you need to watermarked them, after finished the I then change the image size and save via Save for Web and Devices which use JPEG 60-70% Quality (to prevent random people having a full quality of shots I've taken, and smaller filesize). This of course are different with my Manga saving which use PNG-8
To save a setting make a preset by:

Click the button which look like Paragraph formatting with a down-arrow at the left of it. This button is located on the right of Preset Dropdown, and above Colors.
Then Click Save Settings.
Name whatever you like, and everytime you want to save manga scans, select the preset you've made and set the colors for it.
No comments:
Post a Comment